Person
- int Id
- string Name
- DateTime Birthday
- Uri
- System.Text.Encoding Encoding
empty
number
- int n
- double? scale
- DayOfWeek


// C# Advent Calendar 2018 の 23 日目の記事です。
デバッガーのようなものを自作してみました。
というわけで、WPF でプロトタイプ「Tick-tack Debugger」を作ってみた結果、このようになりました。
例として、ニュートン法で平方根を求めています。 (クリックで拡大)
以下は概略の技術解説です。
WPF アプリを作成する前に、まず .NET Framework 上のコンソール アプリで実験してみます。
C# の構文解析を使うには、NuGet で Microsoft.CodeAnalysis.CSharp をインストールします。
デバッグ対象となるソースコードにデバッグ コードを挿入し、それを動的にコンパイルして実行する、という方針です。
コンソール アプリのソースコードを以下に示します (全体のソリューションは SyntaxTreeSample にあります)。
| using System; | |
| using System.CodeDom.Compiler; | |
| using System.Collections.Generic; | |
| using System.IO; | |
| using System.Linq; | |
| using System.Text; | |
| using System.Threading; | |
| using DebuggerLib; | |
| namespace DebuggerConsole | |
| { | |
| class Program | |
| { | |
| const string SourcePath = @"..\..\..\NumericConsole\Program.cs"; | |
| const string GeneratedPath = @"Program.g.cs"; | |
| static void Main(string[] args) | |
| { | |
| // Generates the code for debugging. | |
| var sourceCode = File.ReadAllText(SourcePath); | |
| var generatedCode = SyntaxHelper.InsertBreakpoints(sourceCode); | |
| File.WriteAllText(GeneratedPath, generatedCode, Encoding.UTF8); | |
| // Compiles and loads the assembly. | |
| var provider = CodeDomProvider.CreateProvider("CSharp"); | |
| var compilerOption = new CompilerParameters(new[] { "System.Core.dll", "DebuggerLib.dll" }) { GenerateExecutable = true }; | |
| var compilerResult = provider.CompileAssemblyFromFile(compilerOption, GeneratedPath); | |
| if (compilerResult.Errors.HasErrors) return; | |
| // Registers the action for breakpoints. | |
| DebugHelper.InfoNotified += (spanStart, spanLength, variables) => | |
| { | |
| Console.WriteLine(string.Join(", ", variables.Select(v => $"{v.Name}: {v.Value}"))); | |
| Console.WriteLine(sourceCode.Substring(spanStart, spanLength)); | |
| Thread.Sleep(1000); | |
| }; | |
| // Calls the Main method. | |
| var entryPoint = compilerResult.CompiledAssembly.EntryPoint; | |
| entryPoint.Invoke(null, new object[] { new string[0] }); | |
| } | |
| } | |
| } |
| using System; | |
| using System.Collections.Generic; | |
| using System.Linq; | |
| using Microsoft.CodeAnalysis; | |
| using Microsoft.CodeAnalysis.CSharp; | |
| using Microsoft.CodeAnalysis.CSharp.Syntax; | |
| using Microsoft.CodeAnalysis.Text; | |
| using DebugStatement = System.ValueTuple<Microsoft.CodeAnalysis.CSharp.Syntax.StatementSyntax, string[]>; | |
| namespace DebuggerConsole | |
| { | |
| public static class SyntaxHelper | |
| { | |
| public static string InsertBreakpoints(string sourceCode) | |
| { | |
| var root = ParseText(sourceCode); | |
| var method = root.DescendantNodes() | |
| .OfType<MethodDeclarationSyntax>() | |
| .FirstOrDefault(m => m.Identifier.ValueText == "Main") | |
| ?? throw new FormatException("The Main method is not found."); | |
| var statements = DetectStatements(method); | |
| var result = sourceCode; | |
| foreach (var (statement, variables) in statements.Reverse()) | |
| { | |
| var (span, debugIndex) = GetSpan(statement); | |
| result = result.Insert(debugIndex, $"DebugHelper.NotifyInfo({span.Start}, {span.Length}{ToParamsArrayText(variables)});\r\n"); | |
| } | |
| return result.Insert(root.Usings.FullSpan.End, "using DebuggerLib;\r\n"); | |
| } | |
| public static CompilationUnitSyntax ParseText(string text) | |
| { | |
| var tree = CSharpSyntaxTree.ParseText(text); | |
| var diagnostics = tree.GetDiagnostics().ToArray(); | |
| if (diagnostics.Length > 0) throw new FormatException(diagnostics[0].ToString()); | |
| return tree.GetCompilationUnitRoot(); | |
| } | |
| public static DebugStatement[] DetectStatements(MethodDeclarationSyntax method) | |
| { | |
| var statements = new List<DebugStatement>(); | |
| DetectStatements(method.Body, statements, new List<(string, SyntaxNode)>()); | |
| return statements.ToArray(); | |
| } | |
| static void DetectStatements(SyntaxNode node, List<DebugStatement> statements, List<(string name, SyntaxNode scope)> variables) | |
| { | |
| // Adds variables. | |
| if (node is VariableDeclarationSyntax varSyntax) | |
| { | |
| var varNames = varSyntax.Variables.Select(v => v.Identifier.ValueText).ToArray(); | |
| var scope = ((node.Parent is LocalDeclarationStatementSyntax) ? node.Parent : node) | |
| .Ancestors() | |
| .First(n => n is StatementSyntax); | |
| variables.AddRange(varNames.Select(v => (v, scope))); | |
| } | |
| // Maps variables to the statement. | |
| if ((node is StatementSyntax statement) && | |
| !(node is BlockSyntax) && | |
| !(node is BreakStatementSyntax)) | |
| statements.Add((statement, variables.Select(v => v.name).ToArray())); | |
| // Recursively. | |
| foreach (var child in node.ChildNodes()) | |
| DetectStatements(child, statements, variables); | |
| // Maps variables to the last line of the block. | |
| if (node is BlockSyntax block) | |
| statements.Add((block, variables.Select(v => v.name).ToArray())); | |
| // Clears variables out of the scope. | |
| if (node is StatementSyntax) | |
| for (var i = variables.Count - 1; i >= 0; i--) | |
| if (variables[i].scope == node) | |
| variables.RemoveAt(i); | |
| else | |
| break; | |
| } | |
| static (TextSpan, int) GetSpan(StatementSyntax statement) | |
| { | |
| switch (statement) | |
| { | |
| case ForStatementSyntax f: | |
| var span = new TextSpan(f.ForKeyword.Span.Start, f.CloseParenToken.Span.End - f.ForKeyword.Span.Start); | |
| return (span, statement.FullSpan.Start); | |
| case BlockSyntax b: | |
| return (b.CloseBraceToken.Span, b.CloseBraceToken.FullSpan.Start); | |
| default: | |
| return (statement.Span, statement.FullSpan.Start); | |
| } | |
| } | |
| static string ToParamsArrayText(string[] variables) => | |
| string.Concat(variables.Select(v => $", new Var(\"{v}\", {v})")); | |
| } | |
| } |
SyntaxHelper クラスでは、デバッグ対象の C# ソースコードを構文ツリー (SyntaxTree) に変換して走査し、
各ステートメントの前にデバッグ用のコード行を挿入していきます。
CSharpSyntaxTree.ParseText メソッドを使うことで、ソースコードを構文ツリーに変換できます。
また、メソッド・ステートメント・式など、すべてのノードを表す親クラスは SyntaxNode クラスであり、
が存在することを知っておけば、だいたいの探索ができるでしょう。
この他に、デバッグ用のコードから呼び出されるメソッドを定義するクラス ライブラリとして DebuggerLib を作成しています。
各ステートメントの位置、およびその直前で存在する変数とその値を通知するために、このライブラリを経由させます。
Program クラスでは、生成されたデバッグ用のソースコードをファイルに保存したら、
System.CodeDom.Compiler 名前空間の CodeDomProvider を使ってこれをコンパイルし、
そのエントリ ポイント (Main メソッド) を呼び出します。
また、デバッグ コードが実行されたときのイベントハンドラーを登録しておき、
Thread.Sleep メソッドを使って、指定した時間だけ停止させます。
これで、デバッグ対象の元のソースコードが次の Program.cs だとすると、
デバッグ用のソースコードとして下の Program.g.cs が生成されます。
| using System; | |
| namespace NumericConsole | |
| { | |
| class Program | |
| { | |
| static void Main(string[] args) | |
| { | |
| // Square root by the Newton's method. | |
| var a = 5.0; | |
| var x = a; | |
| for (var i = 0; i < 100; i++) | |
| { | |
| var xi = (x + a / x) / 2; | |
| if (x == xi) break; | |
| x = xi; | |
| } | |
| Console.WriteLine(x); | |
| } | |
| } | |
| } |
| using System; | |
| using DebuggerLib; | |
| namespace NumericConsole | |
| { | |
| class Program | |
| { | |
| static void Main(string[] args) | |
| { | |
| DebugHelper.NotifyInfo(188, 12); | |
| // Square root by the Newton's method. | |
| var a = 5.0; | |
| DebugHelper.NotifyInfo(214, 10, new Var("a", a)); | |
| var x = a; | |
| DebugHelper.NotifyInfo(240, 29, new Var("a", a), new Var("x", x)); | |
| for (var i = 0; i < 100; i++) | |
| { | |
| DebugHelper.NotifyInfo(302, 25, new Var("a", a), new Var("x", x), new Var("i", i)); | |
| var xi = (x + a / x) / 2; | |
| DebugHelper.NotifyInfo(347, 19, new Var("a", a), new Var("x", x), new Var("i", i), new Var("xi", xi)); | |
| if (x == xi) break; | |
| DebugHelper.NotifyInfo(384, 7, new Var("a", a), new Var("x", x), new Var("i", i), new Var("xi", xi)); | |
| x = xi; | |
| DebugHelper.NotifyInfo(405, 1, new Var("a", a), new Var("x", x), new Var("i", i), new Var("xi", xi)); | |
| } | |
| DebugHelper.NotifyInfo(422, 21, new Var("a", a), new Var("x", x)); | |
| Console.WriteLine(x); | |
| DebugHelper.NotifyInfo(453, 1, new Var("a", a), new Var("x", x)); | |
| } | |
| } | |
| } |
作成したコンソール アプリを実行すると、次の図のようになります (時間間隔は 0.3 秒)。
以上をもとに、WPF アプリでデバッグ ツールを作成しました。
左側の C# ソースコードの部分は TextBox で、編集もできます。
デバッグ実行時は、各ステートメントを選択状態にすることでハイライトしています。
右側の変数一覧が表示される部分は DataGrid です。
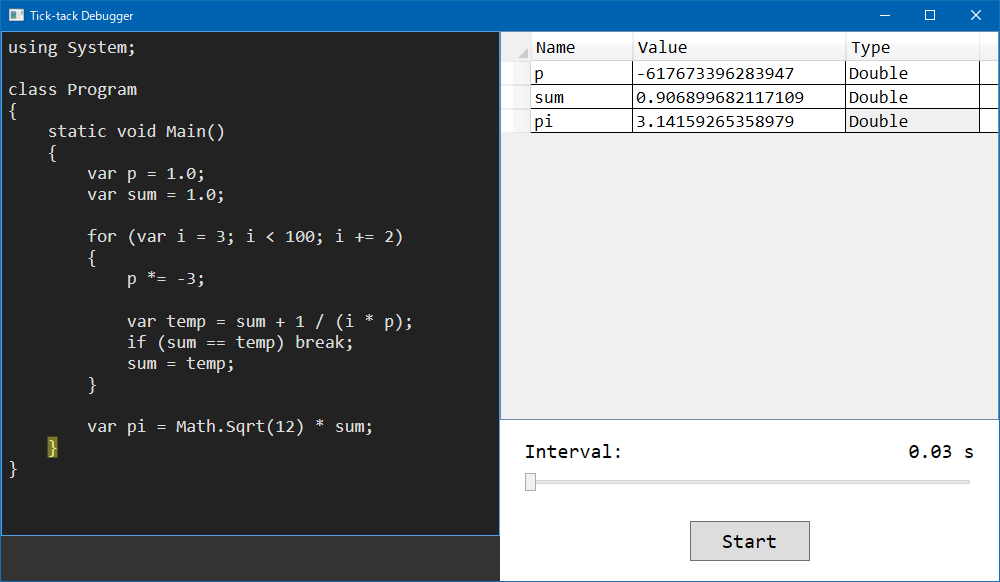
(図は円周率を求める例)
今回は上記の方法でプロトタイプを作ってみましたが、
デバッグ コードの挿入やコンパイルに関しては、よりスマートな方法があるのではないかと思います。
%TEMP% フォルダー (ユーザーの AppData\Local\Temp) に保存されていきます。
Text Template Transformation Toolkit (T4) はテンプレート エンジンの一つで、主に Visual Studio で使われているものです。
これを使うと、ソースコードやデータの集合などのファイルを自動生成できます。
今回は例として、次のような Markdown を記述したら、
それに対応するクラスやプロパティを C# のソースコードとして生成することを考えます。
Person
empty
number
この Markdown の仕様を次のように定めます。
以下では、このような .md ファイルを入力として、
プロパティおよびコンストラクターを持つ部分クラスを .cs ファイルに出力するように T4 で実装していきます。
まず、プロジェクトに上記の .md ファイルを追加しておきます。
そしてプロジェクトに「テキスト テンプレート (.tt)」 を追加します。

追加された .tt ファイルを、仕様に従って次のように実装します。
| <#@ template debug="false" hostspecific="true" language="C#" #> | |
| <#@ assembly name="System.Core" #> | |
| <#@ import namespace="System.Collections.Generic" #> | |
| <#@ import namespace="System.IO" #> | |
| <#@ import namespace="System.Linq" #> | |
| <#@ output extension=".cs" #> | |
| <# | |
| var types = GetTypeDefs(Host.ResolvePath("RecordTypes.md")); | |
| #> | |
| using System; | |
| namespace RecordGenConsole | |
| { | |
| <# foreach (var type in types) { #> | |
| public partial class <#= type.Key #> | |
| { | |
| <# foreach (var prop in type.Value) { #> | |
| public <#= prop.Value #> <#= prop.Key #> { get; } | |
| <# } #> | |
| public <#= type.Key #>(<#= string.Join(", ", type.Value.Select(p => $"{p.Value} {ToCamel(p.Key)}")) #>) | |
| { | |
| <# foreach (var prop in type.Value) { #> | |
| <#= prop.Key #> = <#= ToCamel(prop.Key) #>; | |
| <# } #> | |
| } | |
| } | |
| <# } #> | |
| } | |
| <#+ | |
| Dictionary<string, Dictionary<string, string>> GetTypeDefs(string filePath) | |
| { | |
| var lines = File.ReadLines(filePath) | |
| .Where(l => !string.IsNullOrWhiteSpace(l)) | |
| .ToArray(); | |
| var typeLines = lines | |
| .Select((l, i) => new { l, i }) | |
| .Where(_ => !_.l.StartsWith("-")) | |
| .ToArray(); | |
| return typeLines | |
| .ToDictionary(_ => ToPascal(_.l.Trim()), _ => GetProps(_.i)); | |
| Dictionary<string, string> GetProps(int i) => lines | |
| .Skip(i + 1) | |
| .TakeWhile(l => l.StartsWith("-")) | |
| .Select(l => l.Trim('-', ' ').Split()) | |
| .ToDictionary(p => ToPascal(GetPropName(p)), p => p[0]); | |
| } | |
| string GetPropName(string[] prop) => prop[prop.Length == 1 ? 0 : 1]; | |
| string ToPascal(string s) => char.ToUpperInvariant(s[0]) + s.Substring(1); | |
| string ToCamel(string s) => char.ToLowerInvariant(s[0]) + s.Substring(1); | |
| #> |
注意点は以下の通りです。
hostspecific="true" を指定して Host.ResolvePath メソッドを使う <#= #> :テキストの出力 <# #> :コードを書ける、変数を使える <#+ #> :メソッド、クラスなどを定義できる .tt ファイルを保存したときに処理が実行されます。
または、.tt ファイルを右クリックして [カスタム ツールの実行] を選択すれば実行されます。

これで、以下のように RecordTypes.cs が生成されます。
| using System; | |
| using System.Text; | |
| namespace RecordGenConsole | |
| { | |
| class Program | |
| { | |
| static void Main(string[] args) | |
| { | |
| var person = new Person(4, "Shiro", DateTime.UtcNow, null, Encoding.UTF8); | |
| var n = new Number(3, 2.5, DayOfWeek.Sunday); | |
| Console.WriteLine(n.Scaled); // 7.5 | |
| } | |
| } | |
| public partial class Number | |
| { | |
| public double Scaled => (Scale ?? 1) * N; | |
| } | |
| } |
| using System; | |
| namespace RecordGenConsole | |
| { | |
| public partial class Person | |
| { | |
| public int Id { get; } | |
| public string Name { get; } | |
| public DateTime Birthday { get; } | |
| public Uri Uri { get; } | |
| public System.Text.Encoding Encoding { get; } | |
| public Person(int id, string name, DateTime birthday, Uri uri, System.Text.Encoding encoding) | |
| { | |
| Id = id; | |
| Name = name; | |
| Birthday = birthday; | |
| Uri = uri; | |
| Encoding = encoding; | |
| } | |
| } | |
| public partial class Empty | |
| { | |
| public Empty() | |
| { | |
| } | |
| } | |
| public partial class Number | |
| { | |
| public int N { get; } | |
| public double? Scale { get; } | |
| public DayOfWeek DayOfWeek { get; } | |
| public Number(int n, double? scale, DayOfWeek dayOfWeek) | |
| { | |
| N = n; | |
| Scale = scale; | |
| DayOfWeek = dayOfWeek; | |
| } | |
| } | |
| } |
作成したサンプル
テストしたバージョン
参照
ビルド用 PowerShell スクリプトの Build Release (GitHub) を .NET Framework プロジェクト形式向けに提供していましたが、
今回は .NET Core プロジェクト形式向けのビルドツールを追加しました。
ツールの内容:
アセンブリのバージョン (x.y.z の z の部分) を 1 だけ増加させます。
.NET Core プロジェクト形式では、プロジェクト ファイル (.csproj) でバージョンを書き換えます。
プロジェクトを Release でビルドして、ZIP ファイルを作成します。
ビルド前にアセンブリのバージョンを増加させます。
プロジェクトを Release でビルドして、NuGet パッケージを作成します。
ビルド前にアセンブリのバージョンを増加させます。
これらのツール (PowerShell スクリプト) を使う方法としては、Visual Studio の「外部ツール」に登録するのが便利だと思います。
前回にビルド用のスクリプトを Visual Studio の外部ツールに登録する方法について書きましたが、
.NET Core 版の手順も改めて以下に書いておきます。
Build-Release/Downloads (GitHub) からツールの最新版をダウンロードして任意のフォルダーに展開します。

Visual Studio のメニューで [ツール] – [外部ツール] を選択して各スクリプトを追加していきます。
powershell.exe -ExecutionPolicy Unrestricted "C:\scripts_folder\KTools.xxx.ps1" $(ProjectDir)
$(SolutionDir) でもよい 
.NET Core 向けのプロジェクト テンプレートを選択してプロジェクトを作成します。

.NET Framework プロジェクトではバージョン番号などを AssemblyInfo.cs に記述しますが、
.NET Core プロジェクトではプロジェクト ファイル (.csproj) に記述します。
初期状態ではバージョンが設定されていない (その場合は 1.0.0 と判定される) ため、
プロジェクトのプロパティで [パッケージ バージョン] の値を設定しておきます。

上記の設定をして保存すると、.csproj ファイルの <Version> に反映されます。

なお、.NET Core のプロジェクト形式でも、
<TargetFramework>net45</TargetFramework>
のようにすれば .NET Framework をターゲットにすることができます。
詳細は .NET Core と .NET Standard を参照してください。
ツールの実行:
対象のプロジェクト内のファイルを開いた状態で、メニューからスクリプトを選択すると実行されます。

実行すると、ログが Visual Studio に出力されます。

同様に、メニューから Zip Release を実行します。
zip フォルダーに ZIP ファイルが作成されます。

クラス ライブラリ プロジェクトを対象に NuGet Packup を実行します。
pkg フォルダーに NuGet パッケージが作成されます。

注意点
前回: ビルド用のスクリプトを Visual Studio の外部ツールに登録する
テスト済バージョン
Visual Studio 2017
参照
Build Release (GitHub)
外部ツールの管理
.nuspec File Reference for NuGet
以前にビルドして ZIP にする PowerShell スクリプトを作成しましたが、
そのときはプロジェクトごとに NuGet でインストールする方法を前提としていました。
今回は各スクリプトを Visual Studio の外部ツールとして登録する方法も便利だとわかったため、その利用手順を紹介します。
設定手順:
powershell.exe -ExecutionPolicy Unrestricted "C:\scripts_folder\KTools.xxx.ps1" $(ProjectDir)
$(SolutionDir) でもよい 
以上の設定で、「プロジェクト フォルダー上で PowerShell スクリプトを実行する」ためのメニューが
Visual Studio の [ツール] メニューに追加されました。
実行するには、対象のプロジェクトのファイルを開いているときにメニューからそれらを選択します。

[出力ウィンドウを使用] がオンに設定されていると、ログが Visual Studio に出力されます。


このように Visual Studio の外部ツールを利用することで、
バージョンアップ、Release ビルド、ZIP 作成が Visual Studio から簡単にできるようになりました。
このツールは .NET Framework プロジェクト形式向けに提供していますが、
次回は .NET Core プロジェクト形式向けのツールを追加します。
テスト済バージョン
Visual Studio 2017
参照
Build Release (GitHub)
外部ツールの管理
Visual Studioの外部ツール機能を活用してみよう
ビルドして ZIP にする PowerShell スクリプト
前回の .NET Core と .NET Standard に引き続き、今回はコマンドラインでアプリやライブラリをビルドする方法を検証しました。
まず、ビルドに関連する dotnet コマンドの一覧を挙げます。
基本的にはプロジェクト フォルダー上で実行しますが、build や pack などは ソリューション フォルダー上でも実行できます。
以下、詳細について記述していきます。
dotnet msbuild と msbuild の動作は同じです。
dotnet msbuild /p:Configuration=Release /t:Rebuild
msbuild /p:Configuration=Release /t:Rebuild
ただし、msbuild は環境変数の PATH に設定されていないため、
cmd や PowerShell で実行するにはそのパスを指定しなければなりませんが、
dotnet は PATH に設定されているため cmd や PowerShell でそのまま実行できて便利です。
リビルドするには --no-incremental を指定します。
dotnet build -c Release --no-incremental
ただし build では、.NET Core を対象とする場合、NuGet 参照の DLL がコピーされません。
build では開発環境が想定されており、.dev.json ファイルに NuGet 参照が記述されます。
(.NET Framework を対象とする場合は NuGet 参照の DLL もコピーされます。)
配置用にすべての DLL を含めるには publish を使います。
プロジェクトに対象のフレームワークが複数ある場合、-f で一つだけ指定します。
dotnet clean -c Release
dotnet publish -c Release -f netcoreapp2.0
なお、publish 単独ではリビルドができないため、先に clean を実行しています。
出力先のディレクトリを変更するには -o を指定します。
dotnet pack -c Release -o pkg
または、
dotnet msbuild /p:Configuration=Release /t:pack
[構築時に NuGet パッケージを生成する] (.csproj では GeneratePackageOnBuild) を設定して build する方法もあります。
dotnet build -c Release --no-incremental

前回: .NET Core と .NET Standard
次回: ASP.NET Core Web API の Tips
作成したサンプル
バージョン情報
参照

